How I Modded Rakka's Dragon so the Squeaker Would Last
Okay, Rakka loves squeaky stuffies, but she wrecks them. She has squeaky toys that last like the Cuz and so on, but she wrecks the stuffies pretty quick. So I invested in one with "chewguard" technology. But, then she wrecked the squeaker within seconds of getting her mouth on it. So, here's my solution for getting Rakka a squeaky plush toy that will last.
It's basically replacing the broken squeaker with a durable squeaky ball, but here's a tutorial for those who have no sewing experience. All you need is a needle and thread, and preferably a seam-ripper, but you could use anything sharp. Nail clippers or a little knife or whatever.
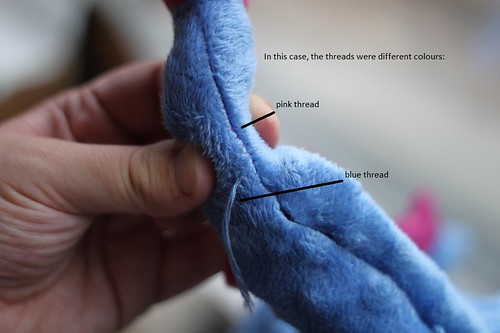
First things first, you have to make a hole for removing the old squeaker and putting the new one in, assuming your dog hasn't already ripped any holes in it, in which case, you work is done for you! The easiest way is to find the turn hole from when the toy was originally made. Since toys are sewn inside-out, there's a "turn hole" left so they can turn it right-side-out, and then they stitch the hole closed. The stitching is looser and easier to undo and you don't have to worry about the hole getting too big because on either side of the hole, they will have back-stitched the normal sewing while it was inside-out. Clear as mud, right? Anyway, here's how you find the turn hole. You just lightly tug at the seams all over the toy until you see a spot where the stitching looks different, like on Mario here.

Then you use your seam-ripper (or sharp thing) to break the thread. On Rakka's dragon, I only had to break one stitch and the whole hole busted open.

Take out the old squeaker and replace it with something that won't break so easily. I used the JW iSqueak size small.
And stitch the hole up using the ladder stitch method, like in this video tutorial:

There you go. Ours is lasting quite well!
It's basically replacing the broken squeaker with a durable squeaky ball, but here's a tutorial for those who have no sewing experience. All you need is a needle and thread, and preferably a seam-ripper, but you could use anything sharp. Nail clippers or a little knife or whatever.
First things first, you have to make a hole for removing the old squeaker and putting the new one in, assuming your dog hasn't already ripped any holes in it, in which case, you work is done for you! The easiest way is to find the turn hole from when the toy was originally made. Since toys are sewn inside-out, there's a "turn hole" left so they can turn it right-side-out, and then they stitch the hole closed. The stitching is looser and easier to undo and you don't have to worry about the hole getting too big because on either side of the hole, they will have back-stitched the normal sewing while it was inside-out. Clear as mud, right? Anyway, here's how you find the turn hole. You just lightly tug at the seams all over the toy until you see a spot where the stitching looks different, like on Mario here.

Then you use your seam-ripper (or sharp thing) to break the thread. On Rakka's dragon, I only had to break one stitch and the whole hole busted open.

Take out the old squeaker and replace it with something that won't break so easily. I used the JW iSqueak size small.
And stitch the hole up using the ladder stitch method, like in this video tutorial:

There you go. Ours is lasting quite well!


Comments